giovedì 17 maggio 2012

"Heartbreakers Squadron" close ups


Interested in a tutorial showing how vector techniques can help 
to better render a vintage bra like this one? Look herehope you dig it.

domenica 19 febbraio 2012

Can vectors help to better draw a vintage bra?

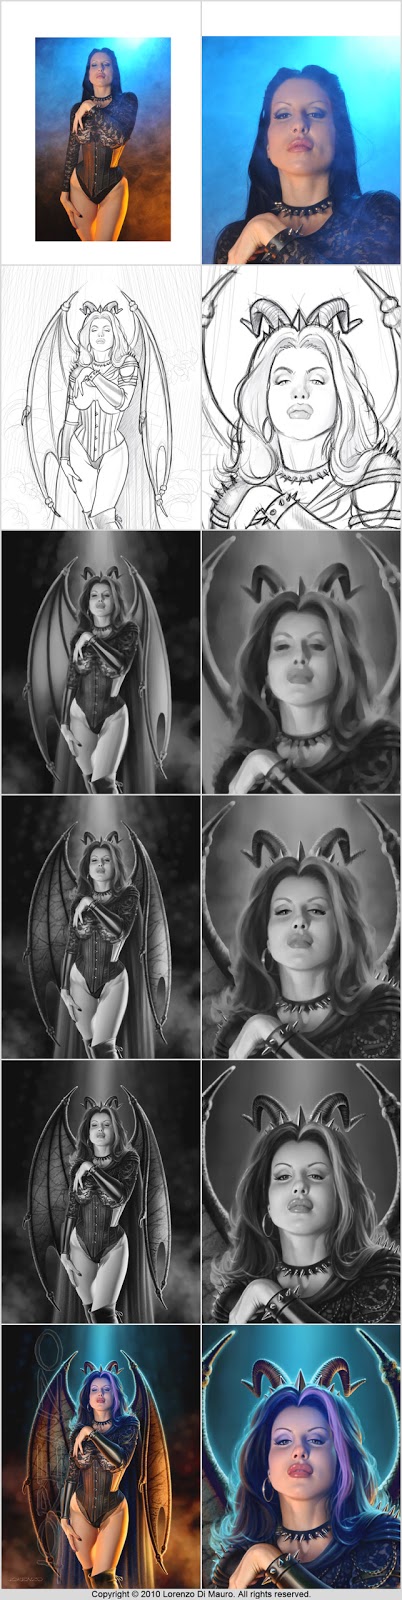
Here's a little tutorial about how much is useful considering the use of vector techniques even while you're painting. My latest painting had to have a retro feel, also the lingerie of the model was typically vintage, with large bra cups decorated by concentric stitching. To better design the structure of the bra, I thought of using vectors. Here are steps of the process:
Crop the area you are interested in pencil drawing.
Import it in your vectorial application. I use Freehand but I think that anything can be done in Illustrator as well.
Place it in the background layer, to view it as through a veil.
Draw with the circle tool the two wider ellipse of the bra cups.
Then trace the upper smallest ones.
Select the two ellipses of the same cup, the largest and the smallest.
Do a fusion between them.
Select the two ellipses of the other cup.
Second fusion.
Select the first fusion and adjust the proper number of steps.
The same for the second one.
Please notice that this feature allows you to adjust the initial arrangement, by selecting the upper smallest ellipse within each fusion and moving it as you like.
Once you're satisfied, remove the pencil draw.
Then exports the two fusions as an EPS file. The size is already exact, just open the EPS file with Photoshop at the same resolution of your painting and you will get lines on a transparent background, ready to be applied to a new layer of your painting.
In this case, there is need to delete lines in the orange area, and adjust them manually with a fine brush in the yellow area.
And this is the result. What I like about these synergies between applications is that the process is also useful even if you're painting with traditional techniques. For many years I have worked with traditional media and, when the computer appeared, doing commercial work, I often had many benefits from this mix of techniques to get the results I was looking for.

If you liked this tutorial, hope you would consider to follow this blog. 

martedì 14 febbraio 2012

"Bombs Away" painting

It's my pleasure to share a painting I have done for the upcoming 
"Wings of Angels" Art Book of the amazing photographer Michael Malak
I loved very much this project and got so much fun working on this piece, 
to look at pinup and aircraft close ups below, just scroll down this page.


Photo Inspiration: Michael Malak
Model: Sarah Barton


"Bombs Away" pinup close ups

Click here to see a tutorial showing how vector techniques 
can help to better render a vintage bra like this one. 
If interested, check it out. Hope you dig it.


"Bombs Away" aircraft close ups


Photo Inspiration: Michael Malak

domenica 29 gennaio 2012

"Glamour Wars" limited edition

This is a co-production with Paul Grisar of Pinupexpo: 
hand enhanced canvas prints 132x100 cm - 5 prints and 2 artist's proofs.
Prints are are available in exclusive at Piunpexpo 
After the printing process on canvas, I painted with acrylic colors 
the white flowers in foreground, the waiter and the background.
The original photo is © 1978 Joe Shere / mptvimages.com


"Marilyn again" limited edition

Questo riepilogo non è disponibile. Fai clic qui per visualizzare il post.

"Erotic Fantasy Art Vol. 2" Art Book

Don't miss this just released Art Book "Erotic Fantasy Art Vol. 2" 
It features three of my works and the "Dark Queen" painting as front cover.
Thanks to Ilex Press and Paul Peart Smith for including my works 
in this amazing collection!


domenica 20 novembre 2011

"Chanel Bon Bon" interactive step by step painting process

Here is a complete step by step painting process 
of the "Chanel Bon Bon" painting.
 I have done it since I'm often asked for tutorials or descriptions 
about my painting technique.


It’s an interactive Flash movie, once started by clicking on the cover,
the movie goes on by itself but at any time you can stop and restart it, 
go on forward or backward step after step as fast as you click quickly. 
Also this is a small version of the movie, if interested,
 don't miss the wide version: 1280x800 pixels here:


417x550


lunedì 10 ottobre 2011

Goodbye, Steve!

Although it was expected, Steve Jobs death has saddened me so much 
to stop the work I was doing to dedicate a tribute to the father of the Mac. 
Here are a few actual size details. See the whole work by clicking the title.

Goodbye, Steve! Thank you for thinking different.


domenica 18 settembre 2011

Interview (click here)

Khuan Tru, a friend artist, was kind enough to publish 
an interview on my work at his website... check out it!


venerdì 29 aprile 2011

"Dig it?" close ups


The title "Dig it?" here means something like "What you're looking at?" or "Would you like a chair?". The girl is asking why you are so much interested in her back. 
So cute, so naive... but actually she knows what magnetized your eyes.  


venerdì 18 febbraio 2011

From today my tubes are available at PTE!

For owners of Lorenzo licenses does not change anything! They were kind enough to keep up the existing numeration. So there is no need of any license exchange. I hope that you will appreciate the service of PTE and also that you will keep up supporting my work. Thank you all!

venerdì 4 febbraio 2011

giovedì 27 gennaio 2011

"Marilyn Again" details

I'm posting these actual size details just to show this new technique I'm using. Though it may seem vectors, I worked in photoshop making rough selections then filled with an opacity from 15& to 30%. Lots of these selections give an effect like glazing paint.


domenica 9 gennaio 2011

"Dark Queen" step painting process


Since I was asked by someone to post a step painting process, this time I forced myself to keep some steps during my latest work, which I almost always forget to do... My painting technique is a time consuming job and, while working, I often forget everything else.

This time I used a single photo of the gorgeous model Madeleine Horn as a reference, but often is not so and when making my pieces to get what I want, I take parts from several photo references.

First I did a pencil sketch of what I had in mind - here it's digital, sometimes I do it on paper - then I started a grayscale painting, a sort of underpainting which is a classical technique used since the Renaissance. Even if I don't use always this way to proceed, the most part of my recent artworks are done so. I really love this technique, especially in this grayscale step. It's just like sculpting with light and shadows and it's the best to define the proper tonal value and contrast for later painting.

Once I'm happy with composition, detail and tonal balance, I go on the coloring step. I do so also when working with traditional tools, by applying successive layers of color, transparent enough not to cover the underpainting.
Using Photoshop this is easier, working in a layer settled in 'color' mode.

The pencil and the rough underpainting steps are done in Painter, the finish grayscale and the color steps in Photoshop.